It is difficult to become a professional in any field. It takes time to develop your own style and technique, especially for artists.
Contents
This shouldn’t stop you from learning and transforming your skills into the things you want.
We all know you have to start somewhere. However, there are many tutorials and guides that can help you get started. How to Draw Eyes by BIOWARS is one example of such a guide. You can even see everything in a video.
Let’s get started by learning how to professionally draw portraits.
Here are some things you need to know before you start
Although it’s true that anyone can draw a professional portrait, it takes practice and experience.
Start with the basics, and work your way up. It will be easier to draw portraits if you have experience.
You can draw caricatures, characters from anime or animated movies, as well as characters from books. These will all help you create a professional and realistic portrait.
Don’t be afraid to start if you are new. We will help you every step of the way.
Preparing for the Stage
It is important to ensure that you have everything necessary to complete this project. Most of you know what equipment you’ll need. If you’re a novice, these are the basics:
- Sketchbook If you are minimalist and only use pencils, any sketchbook will work. If you plan to color your drawing using oil paints, watercolors, markers, or other colors, be sure to get a sketchbook that has thicker paper.
- Pencils- You will need to start with an outline, so an HB pencil is the best choice. For shading, you can use B pencils. The higher the number, it will darken the shade. If you are familiar with drawing with coal, you can choose to draw and sketch with it.
- Eraser There are many types of erasers. The most common is the kneaded, which can be used to create shading and is best for drawing with coal. If you are only using pencils, a regular pencil eraser can also be used.
- Ruler – A ruler is completely optional. If you have more time and need to practice drawing straight lines while sketching the placements of a single face, you can still use one.
Selecting a model for your portrait
Once you have all your materials, you can start choosing your model. You can choose to have a live model. This could be a relative or friend posing in front of you, or even someone from the street.
You could also choose a photo from your computer and draw it instead. You should choose a person with shadows, not a person who is lit by a white light that has very few shades.
It might be easier to draw live models if you’re a beginner. The shadows of a person’s faces are different from those in a photograph. You will also be able see how deep they run.
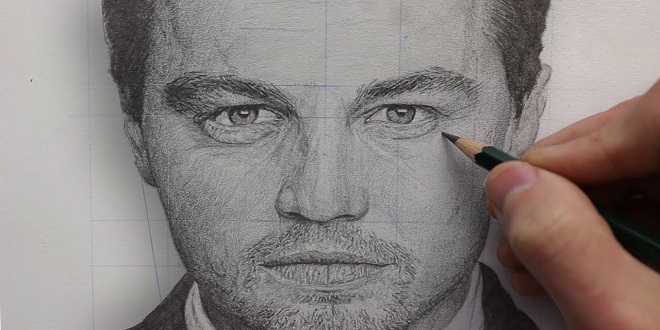
Step 1.
After you have selected your model, it is time to sketch the head under the angle that the model is posing. You can choose any angle that you think is best for you. It can be frontal, sideways, slightly upwards, or down, just like Kubrick’s stare.
Let’s now build the base.
- Measure the width and length of your head. You can use a pen or a paintbrush to determine how many widths it has. Larry Withers explains all the measurements in this video.
- Calculate the angle Before you lay down the base, the positions of eyes, nose and lips, as well as the other details, it is necessary to determine the angle. You can determine what is visible if you select a model that has its head slightly to one side. Are the eyes equal in size or smaller? Is it possible for them to be seen in the same way?
- Draw a ruler along the side. If you’re unsure about how to properly divide the face, you can draw a “ruler”, which will help you with your placements. It should look like this
- Draw the head – After you have completed the previous steps, you can start sketching the shape of your head.Remember that people have different head shapes and you can’t just copy what you see in a sketchbook online.
- The shape of your jaw is important – Men tend to have more angular and pronounced jaws.Keep in mind the face shape of your model.
Step 2.
Professional portraits can be made or broken by the placement of the correct elements. Many artists have difficulty drawing portraits at first because they draw exactly what they see. But is this true?
Our eyes can be deceitful. What we see may not reflect what it will look like on paper. It is why it is so important to measure and set everything accurately.
Did you ever try drawing a portrait and it turned out to be droopy? We know. It happened to us too.
It is frustrating when you try to draw someone’s face, but it looks more like a relative of the model. This is why the next step is so helpful.
Step 3.
The eyes are the window to the soul. The eyes tell us about a person’s life, character and facial expressions.
The term “beady eyes” is used to describe someone who has small eyes. However, the term is often associated with evil eyes. If someone has small eyes, drawing them larger, more doe-like, will change their facial expression.
There are many sizes and shapes of the nose, including angular, prominent, wider or narrower. Do you think it looks more like a button? These characteristics are important if you want to draw realistic portraits.
You can draw your ears by measuring the nose.
The lips are the easiest part to draw. This tutorial will show you how to draw perfect lips.
Step 4.
The last step is to sketch our hair and ears. When you have finished sculpting your head, the hairline should be in the middle of the circle.
As mentioned, the ears will almost always be the same size as the nose when it comes to length. These are the most straightforward part of the face that you can draw.
The brows should be in line with the brow bone. This requires that you are familiar with your anatomy. The best way to determine where the brow bones should be placed is to look at a skull. If the person has a shaved brow or draws them higher, they shouldn’t be too high.
Step 5.
There are many shading methods you can choose from. Cross-hatching and hatching are the most common shading techniques for artists.
These shades will enable you to create very light, “fluffy” colors as well as darker, more compact shades that barely reach the face.